Fance Home
Designing a compact bathroom is not simply a matter of shrinking fixtures. It requires careful planning, practical experience, and honest attention to daily habits. This guide, “China Top 10 How to Design a Compact Bathroom Space,” explores solutions that make limited rooms feel useful, calm, and visually open.
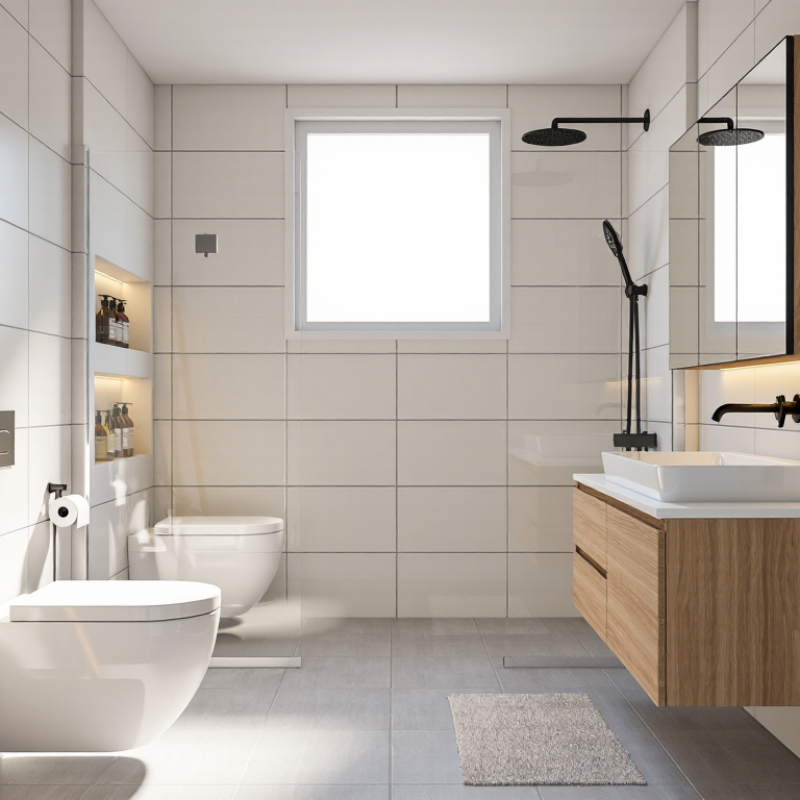
Architect Ludwig Mies van der Rohe’s famous principle, “Less is more,” offers a strong foundation for small bathroom design. Yet less should never mean uncomfortable. A wall-hung toilet can expose more floor area. A narrow vanity may provide storage without blocking movement. Clear glass can preserve sightlines, while pale tiles reflect daylight across the room.
Measure every corner.
A compact bathroom may have only three square metres, but small decisions still shape its performance. Door swings, pipe positions, ventilation, lighting, and cleaning access deserve equal attention. Recessed shelves can hold shampoo bottles inside the wall. Mirrored cabinets can combine reflection and storage. Warm LED lighting can soften hard surfaces and reduce the feeling of confinement.
Still, not every popular solution works everywhere. A floating vanity may look elegant but offer limited storage. Glossy tiles may brighten the room while revealing water marks. These compromises deserve reflection before installation. Good design balances appearance, safety, maintenance, and long-term comfort.
The following ideas focus on realistic layouts, space-saving products, durable materials, and adaptable details. They are intended to support informed decisions, not replace local building guidance or professional measurement. A compact bathroom can feel generous, but only when every centimetre earns its place.
China Top 10: How to Design a Compact Bathroom Space
Define space requirements before choosing tiles, cabinets, or sanitary fixtures. Measure the room’s length, width, ceiling height, door swing, window position, and existing drainage points. Record every obstruction. A 10-centimeter error can disrupt the entire layout.
The National Kitchen & Bath Association recommends about 30 by 48 inches of clear floor space at bathroom fixtures. Its planning guidance also suggests at least 21 inches in front of a toilet and 30 inches in front of other fixtures. These figures support safer movement, but local building codes may require more. Verify them with a qualified designer or inspector. The 2024 International Residential Code also uses a 21-inch minimum clearance in front of toilets and bidets. Do not treat these numbers as universal permission.
Draw the measured room on graph paper or digital software. Mark a 600-millimeter shower zone, door arc, and walking path. Keep the basin from colliding with the door or a towel rail. Houzz’s 2024 U.S. Bathroom Trends Study found that many homeowners upgrade showers and storage during renovations, showing how strongly these elements influence planning. Still, adding storage everywhere can make a compact room feel crowded. I have seen layouts fail because designers measured walls, but ignored skirting boards and pipe covers. Measure twice. Leave service access. A slightly smaller cabinet may create a far better daily experience.
A compact bathroom works best when fixtures follow a clear movement path. Measure the room, door swing, window, and existing plumbing points before choosing a layout. A wall-mounted toilet can free floor space, while a corner basin reduces conflict near the entrance. Keep the shower at the far end when possible. This creates a simple circulation line from the door to the bathing area.
Allow enough clearance for safe daily use. Many professionals recommend checking local building codes and accessibility guidance before fixing positions. A shower zone should not force users to turn sideways to enter. Use a sliding or outward-opening door if an inward swing blocks the basin. Place towel storage within arm’s reach, but keep it outside the shower spray. Small details matter.
Test the plan with masking tape on the floor. Walk through it with wet towels, laundry baskets, and cleaning tools. The drawing may look efficient, yet the real space can feel tight. I once underestimated the reach needed beside a compact basin. That mistake made the layout less comfortable. Leave service access around valves and drainage points. It may reduce storage slightly, but repairs become easier and safer. Recheck lighting, ventilation, and floor slopes before installation. A beautiful plan still fails when water collects beside the doorway.
| No. | Layout Strategy | Recommended Planning Data | Fixture and Circulation Arrangement | Space-Saving Benefit | Best Application |
|---|---|---|---|---|---|
| 01 | One-Wall Linear Layout | Allow about 1.5–1.8 m of usable wall length for a compact WC, basin and shower zone. | Place the basin near the entrance, the WC in the middle and the shower at the far end. Keep the main passage approximately 750–900 mm wide where possible. | Concentrates plumbing on one wall, reduces pipe runs and leaves the opposite wall visually open. | Long, narrow bathrooms and small rental apartments. |
| 02 | Wet-Dry Zoning | Use a shower enclosure around 800 × 800 mm or larger when the available room permits. | Separate the shower with a glass screen or fixed panel. Keep the basin and WC in the dry zone outside the direct spray area. | Maintains a clear dry circulation route and reduces the need for a full-height partition. | Family bathrooms requiring faster daily use and easier cleaning. |
| 03 | Corner Shower Layout | A corner shower footprint of approximately 800–900 mm per side is a practical compact target. | Use the corner for the shower, position the basin on the adjacent wall and place the WC opposite or beside the basin without blocking the door swing. | Uses a normally difficult corner and preserves a larger central floor area. | Nearly square bathrooms with limited wall length. |
| 04 | Outward-Swinging or Sliding Door | Keep at least 600–700 mm of unobstructed entry width; verify local regulations for emergency access and door direction. | Use a sliding door where wall structure allows, or swing the hinged door outward so it does not collide with the basin, WC or shower screen. | Recovers the floor area normally occupied by the door leaf and improves accessibility. | Very small bathrooms and layouts with a door facing a fixture. |
| 05 | Wall-Hung Fixtures | Plan a clear floor zone of roughly 600 mm in front of the WC and about 600–750 mm in front of the basin. | Use a wall-hung WC and floating vanity where the wall can support the concealed frame and plumbing system. | Exposes more floor surface, makes cleaning easier and creates a lighter visual appearance. | Modern compact bathrooms with suitable structural walls. |
| 06 | Reduced-Depth Vanity | A vanity depth of approximately 350–450 mm can work in a compact room; retain enough basin projection for comfortable use. | Choose a narrow rectangular basin, use drawers with shallow plumbing clearance and keep the vanity edge outside the door swing. | Adds storage while reducing interference with the entry and circulation path. | Entry-level bathrooms and narrow en-suite rooms. |
| 07 | Outside-the-Bathroom Basin | Reserve a basin zone about 600–900 mm wide and maintain a comfortable approach area in front of it. | Place the hand-washing basin in a small vestibule or corridor niche, while keeping the WC and shower behind the bathroom door. | Separates hand washing from bathing and allows more simultaneous use of the home. | High-use family homes and bathrooms serving guests. |
| 08 | Pocket or Recessed Storage | Use wall recesses around 100–150 mm deep only after checking waterproofing, structure and pipe locations. | Build niches between suitable wall studs or use a mirrored cabinet above the basin; keep storage edges clear of the shower entry. | Stores toiletries without extending cabinets into the circulation zone. | Shower areas and bathrooms with limited cabinet depth. |
| 09 | Combined Bathing and Laundry Zone | Allow approximately 600 mm appliance width for a compact front-loading washer, subject to the selected appliance specifications. | Place the washer beneath a counter or beside the vanity, keep electrical points away from splash zones and maintain access for servicing. | Combines two functions in one wet room and avoids a separate utility area. | Apartments with no dedicated laundry room. |
| 10 | Clear-Center Circulation Layout | Target about 750–900 mm of clear movement space where possible; increase the width for accessibility requirements. | Place bulky fixtures along the perimeter, avoid opposing protrusions and maintain a direct route from the door to the shower and WC. | Improves movement, reduces visual clutter and makes the room feel larger than its measured area. | Any compact bathroom, especially one shared by several users. |
Planning note: Dimensions are practical residential planning ranges in millimetres. Confirm the final layout against local building, plumbing, electrical, waterproofing and accessibility requirements, as well as the actual dimensions of selected fixtures.
A compact bathroom works when every fixture earns its footprint. Choose wall-hung or short-projection sanitaryware to protect clear floor space. A 480–500 mm basin can preserve elbow room without feeling miniature. Select a rimless toilet with dual flushing. The U.S. EPA states that WaterSense-labeled toilets use at least 20% less water than standard models. WaterSense showerheads also use no more than 2.0 gallons per minute. Measure door swings, pipe routes, and cleaning access before ordering. On site, beautiful layouts can fail when cabinets block radiators or doors.
Storage should rise, not spread. Use a mirrored cabinet for medicines, shallow shelves for towels, and drawers with internal dividers. Keep daily items between waist and eye level. Moisture-resistant boards and sealed edges matter more than decorative finishes. Houzz’s 2024 U.S. Bathroom Trends Study reports vanity upgrades in 84% of renovation projects, confirming storage’s central role. Yet tall cabinets can make narrow rooms feel crowded. Leave one open wall. Use pale fronts to reduce visual weight. Test clearances with masking tape.
Smart fittings should solve a specific problem. A thermostatic valve reduces temperature hunting, while leak sensors can warn about hidden water damage. Choose tactile overrides and accessible batteries. The U.S. Department of Energy notes that automated controls can reduce unnecessary energy use, but results depend on settings and behavior. This approach is not perfect. Wet fingers, weak Wi-Fi, and low batteries expose poor design. Provide manual controls and simple maintenance access.
China Top 10 How to Design a Compact Bathroom Space
Coordinate Materials, Lighting, Ventilation, and Safety
In many urban Chinese apartments, a compact bathroom must handle moisture, limited storage, and heavy daily use. I begin by measuring every wall, pipe, doorway, and floor slope. Measure twice. Light-colored porcelain surfaces can make the room feel larger, but they should not become dangerously slippery when wet. A matte, textured floor usually offers better traction than a polished one. Keep wall and floor tones related, yet vary their textures to prevent a flat, sterile appearance. Narrow grout lines reduce visual clutter, although they still require careful cleaning.
Lighting needs more than one ceiling fixture. A waterproof ceiling light provides general visibility, while vertical lights near the mirror reduce shadows on the face. Choose a neutral color temperature for accurate grooming. Avoid placing bright lights directly behind the user. That mistake creates a dark reflection. Ventilation is equally practical. An exhaust fan should move humid air outside, not into a ceiling void or enclosed corridor. Leave a small air gap beneath the door, and clean the fan grille regularly. A quiet fan may encourage longer operation after showers.
Safety details deserve early planning. Use protected electrical outlets, rounded furniture edges, and secure grab points near the shower area. Keep wet and dry zones visually clear with a raised threshold or suitable glass partition, where space allows. I once prioritized a larger mirror and reduced the clearance beside the toilet. It looked efficient on paper, but daily movement felt awkward. A full-size cardboard mock-up would have exposed that problem before installation. Good design still needs honest testing.
China Top 10 How to Design a Compact Bathroom Space
Optimize Installation Details and Long-Term Maintenance
A compact bathroom needs accurate measurements before any installation begins. Leave enough clearance for doors, knees, cleaning tools, and future repairs. Wall-mounted fixtures can free floor space, but their support frames must be fixed securely. Check pipe routes before drilling. A small error may damage hidden water lines. Waterproofing deserves special attention around corners, drains, and pipe penetrations. Let each sealed layer cure fully. Rushing here creates expensive problems later.
Tips: Keep an access panel near concealed valves. Label shutoff points clearly. Use slip-resistant flooring and maintain gentle drainage slopes. A qualified plumber should inspect connections before wall surfaces are closed. Local building requirements still matter, even in a small renovation.
Long-term maintenance begins with simple daily habits. Wipe standing water from glass edges and floor joints. Clean the drain cover weekly and remove hair before blockage develops. Inspect silicone seals every few months for gaps, dark spots, or movement. Replace damaged seals promptly. Ventilation also needs care. Clean the fan grille regularly, and keep airflow unobstructed. I once ignored a slow drain, thinking it was harmless. It later caused an unpleasant odor and hidden moisture. That mistake changed my inspection routine. Small bathrooms are less forgiving. Access, ventilation, and clear records make repairs less disruptive.
Create a clear path from the door to the shower. Place the shower at the far end when possible. A corner basin can reduce entrance congestion. Wall-mounted fixtures may open more floor space.
Mark fixtures with masking tape before installation. Walk through with wet towels, a laundry basket, and cleaning tools. Drawings can mislead. Real movement exposes awkward gaps.
Check door swings, knee space, shower entry, and cleaning access. Users should not turn sideways to enter the shower. Keep service access near valves and drainage points. Local codes still apply.
Choose short-projection or wall-hung fixtures. A basin around 480–500 millimeters can preserve elbow room. Dual-flush toilets can reduce water use. Measure pipe routes before ordering.
Use vertical storage instead of wide cabinets. A mirrored cabinet, shallow towel shelves, and divided drawers work well. Keep daily items between waist and eye level. Leave one wall visually open.
Choose technology for a specific problem. Temperature controls can reduce adjustment time, while leak sensors may detect hidden moisture. Provide manual controls. Wet fingers and low batteries can defeat clever systems.
Seal corners, drains, and pipe penetrations carefully. Let every waterproofing layer cure fully. Secure support frames before closing the wall. A small drilling error can hit a hidden pipe.
Wipe standing water from glass edges and floor joints. Clean the drain cover weekly. Inspect silicone seals every few months for gaps or dark marks. Clean the ventilation grille regularly. Small rooms forgive little.
Designing a compact bathroom begins with understanding the available space. Measure the room carefully, including wall lengths, ceiling height, door swings, plumbing points, and circulation areas. Then choose a practical layout that keeps essential fixtures accessible without creating bottlenecks. Wall-mounted or reduced-size sanitaryware can improve movement, while vertical cabinets, recessed shelves, and mirrored storage help maximize capacity without making the room feel crowded. Clear zones for washing, drying, and changing also make daily use more comfortable.
When considering how to design a compact bathroom space, pay attention to the complete environment rather than fixtures alone. Use coordinated, moisture-resistant materials, layered lighting, effective ventilation, and slip-resistant surfaces to support comfort and safety. Plan installation details carefully, including waterproofing, drainage slopes, access for repairs, and durable seals around wet areas. Finally, select easy-clean finishes and maintain a regular inspection routine so the bathroom remains hygienic, functional, and visually open over time.
